


NOTE - This is strictly a basic tutorial teaching of how to make custom shields/heads/bodies and upload them in game. This tutorial does not include tips on perfecting customs.
Also be sure to read the rules for uploading as some things are not allowed and will not be uploaded (Such as hats or masks on heads)
STEP ONE - DOWNLOADING THE RIGHT PROGRAM
There are thousands of programs on the internet that enhance or alter photos, some free and some cost money.
Best way to find out which one is right for you is to talk to players and see what they use, and then try them for yourself.
Here's a list of programs out there that are very popular with the Graal Community as well as the one I use.
- Paint Shop Pro (Been using since I started designing years ago, the full version costs money but you can download a 30 day trial of the full version online)
- Paint.NET
- Gimp
- Photoshop
- Microsoft Paint
STEP TWO - USING TEMPLATES
A template in basic terms is a pre-made custom that can be used to make sure your custom will work in the game. Think of it as the blue print of designing customs.
Using a template is important if you want to make your head/shield/body work in game. It contains every angle your character faces to ensure you don't mess anything up.
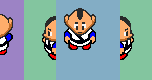
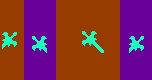
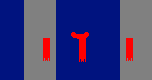
Here is the main templates used in game. Just download the one you want to use. (Credits to Graal Depot for the templates)
Note - The Head and Body templates are on the left while the picture on the right is simply to reference what each graphic does. (Wouldn't want to make your pulling face look like your idle face)
HEAD

BODY

SHIELD


STEP THREE - GETTING STARTED
Now that you have your template and program downloaded you are ready to begin.
A lot of people will just open the template up and work from there but here is a great tip that works better.
Most image editing software has what is called, "Layers". Layers basicly are different sheets of paper stacked on top of each other each containing different drawings.
You can use layers to make sure you don't mess up the original template as well as making sure your work is in the correct spot.
Open your template onto the program. The template is now considered the "Background Layer"
Now search the tool bar for a tab called, "Layers". Now click the sub tab "Create New Layer". *Note - Be sure to set the new layer to Transparent*
This now creates a blank canvas for you to put your artwork on over the template. Now you can trace over the template without damaging it.
STEP FOUR - MAKING YOUR MASTERPEICE
You are now ready to create your new design. There are a few tips you should know to help the process go quicker.
When making heads you can copy and paste the idle images over the other actions and then go back and fill in the face.
For example, If you get done with making the top image of the head looking left, copy it and paste it over the head of it making a pushing motion. Now just erase the face and re-make it to seem like its pushing something.
When making bodies with designs or patterns in the clothes you can create a new image you can speed the process up and make the patterns look natural by
Creating a new image, make the pattern you want on the body there, now find the save file for the software you are using in there you should find a sub-folder titled "Patterns" save your new pattern there.
Now go back to your body and use the fill tool "Paint Bucket" and choose the pattern you just made to fill in all the clothes.
STEP FIVE - ADDING TRANSPARENCY AND CORRECT FILE NAME
Once you are finished creating your work its time to add transparency. If you followed my steps on making layers all you need to do now is choose the "Background Layer" and delete it.
That will get rid of the template you were using and only leave the work you made. The transparency is already set now since you were using a blank canvas to begin with.
If you didn't follow my steps and your new work has a colored background, take the fill tool "Paint Bucket" and change the color of the back ground to a color you didn't use in your work.
Don't worry about it being transparent because when you upload your work on the website you can choose that color to become transparent.
Once you are finally finished you are ready to save the file. At this point be aware that what ever you name the file in your computer will be the file on the game.
This isn't a problem with heads or bodies but with shields if you name it something long and hard to remember you will have trouble typing it in game.
If your work has animation added on it save it under ".gif" but if you followed all my steps and your work has no animation save it under ".png"
STEP SIX - UPLOADING ONTO THE GAME
You are finally ready to upload your work in game. Be sure to keep these things in mind when uploading or else your work could get rejected.
The website to upload your work is http://era-go.com/upload/
- Make sure you followed all rules for customs (http://www.era-go.com/forum/showthre...9-Upload-Rules)
- Be sure to have the correct amount of graalats on your account before submitting your work
- Double check the email you submitted your work is the same one you linked to your graal account.
Prices for uploads depends on which custom you are submitting. Again note that you have the correct amount of graalats in game before submitting on the website.
Heads - 20,000 Graalats
Bodies - 10,000 Graalats
Shields - 2,500 Graalats
Once you submit your work check in game for a red message bubble, follow the instructions from the bot and if correct your work will be uploaded within a few minutes to 24 hours.
REFUND AND ADDITIONAL QUESTIONS
If your work doesn't look right or you want to sell your work back for money later you can get a refund. Or if you would like to get any addition information about uploading you can visit the Custom Sales building in game.
Go to the Era News building which is located to the left of the start location.
In there you will find a door called "Custom Sales"
Go inside and you should see the actual uploading room. This room has all the information I gave here as well as additional rules for uploading.
From that room if you wish to get a refund walk right which will take you into the refund room.
In the refund room you can click the type of custom you made and instantly get your money back.
If you have any addition questions not covered by this tutorial feel free to PM me either on here or on the game.
Thank you for reading this tutorial and I hope to see your custom work on the game soon!


 Reply With Quote


